Adopting KMM in Existing Mobile Apps
How Fleetio introduced KMM into our existing mobile apps.
Background
Earlier this year, we introduced rich text comments to our web and mobile apps (https://updates.fleetio.com/add-links-and-formatting-to-your-comments-4rNMzu). Rich text editor libraries are plentiful for web developers, but few options exist for mobile developers, particularly for SwiftUI and Jetpack Compose which we use for any new UIs.
There are a few HTML-based options for developers. On Android, we landed on RichEditor(https://github.com/wasabeef/richeditor-android). We found an iOS fork RichEditorView(https://github.com/T-Pro/RichEditorView) which provides a similar experience in Swift. Aside from basic rich text editing, we also needed to include some features specific to Fleetio, such as @ mentioning. Instead of writing the HTML/CSS/JS twice or copying-and-pasting from one platform, to another, we decided to leverage Kotlin Multiplatform Mobile (KMM) to share code between platforms.
What is KMM?
From Jetbrains (https://kotlinlang.org/docs/multiplatform-mobile-faq.html):
Kotlin Multiplatform Mobile (KMM) is an SDK for cross-platform mobile development. You can develop multiplatform mobile applications and share parts of your applications between Android and iOS, such as core layers, business logic, presentation logic, and more.
Why KMM?
We've had interest in exploring KMM at Fleetio as a way to share common code between our two platforms. Using KMM to share a rich text editor allows us to experiment with building and deploying KMM libraries.
Compared to other cross-platform technologies, KMM gives mobile teams and easy way to deploy shared libraries without much change to existing native apps.
- Shared libraries can be deployed via Maven for Android and SPM or Cocoapods for iOS devs
- Library code is compiled to native binaries
- Easy to use development with Kotlin Multiplatform plugin in Android Studio
- Code is written in Kotlin allowing Android devs to jump right in and provides a familiar syntax to Swift for iOS devs
- UI code is native. This was a big plus for our devs as we are heavily invested in native-specific UI toolkits (SwiftUI and Jetpack Compose)
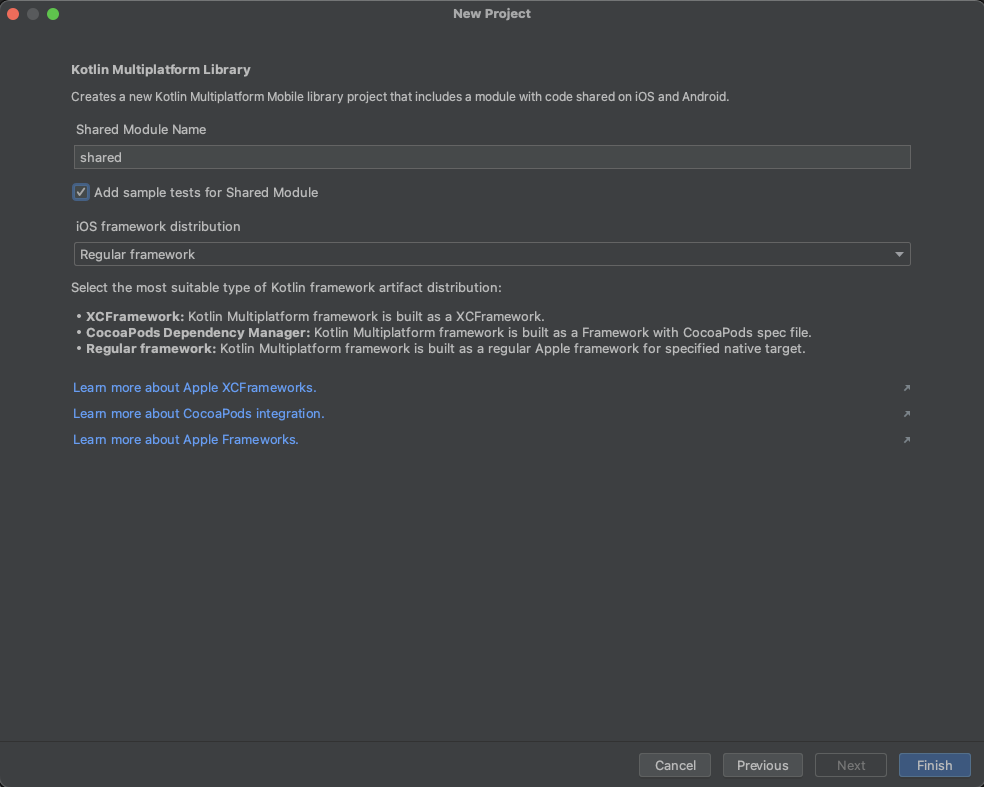
Classic KMM Getting Started
The most common way to start with KMM is using Android Studio. This path is most beneficial for creating brand new mobile apps.
- Install the Kotlin Multiplatform Plugin in Android Studio
- From Android Studio, you can use the new project wizard, and choose Kotlin Multiplatform App or Library
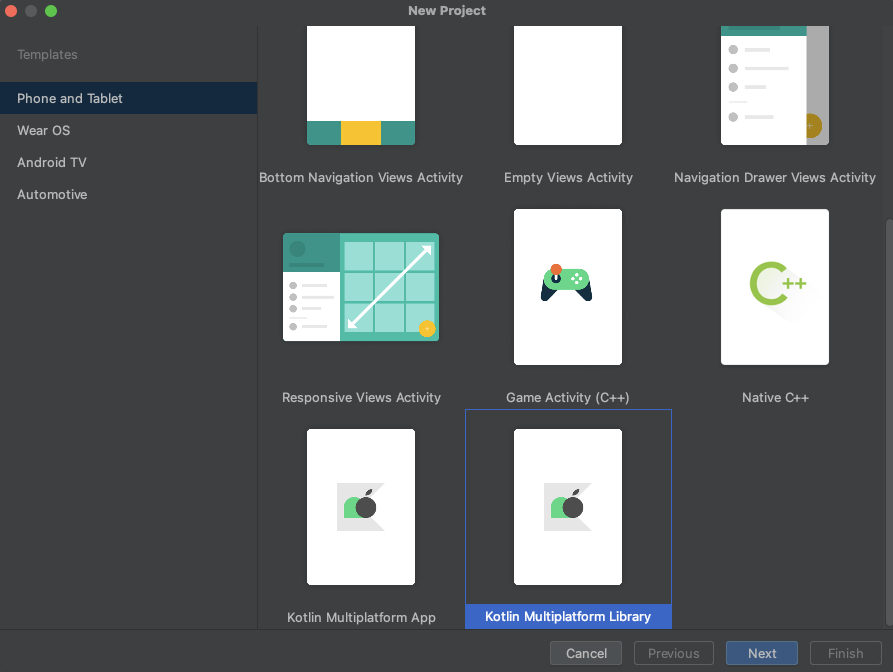
- Configure how your iOS framework will be distributed
Using KMMBridge
KMMBridge (https://github.com/touchlab/KMMBridge) is toolset for deploying prebuilt KMM libraries, specifically for Xcode devs. Using KMMBridge allows library developers to set up KMM build and deployment processes without signficant changes to existing mobile apps.
For us, this meant creating a new shared library for rich text editing without the complexities of refactoring and merging our existing Android and iOS codebases to fit the classic KMM model. Touchlab provides a one hour quick start guide here: https://touchlab.co/quick-start-with-kmmbridge-1-hour-tutorial/. Here's the basics in a nutshell:
- Use the KmmBridge template from Github: https://github.com/touchlab/KMMBridgeKickStart
- Change your
GROUPingradle.properties
The template provides three projects:
shared: the shared KMM library projectandroidApp: the "sample" Android project. We use this debug new library features and show example usage.iosApp: the "sample" iOS Xcode project. We use this debug new library features and show example usage.
KMMBridge Configuration
Our mobile dev team is using KMMBridge with its Github and SPM configurations. KMMBridge provides built-in Github actions to get CI/CD started quickly.
Fleetio's RichTextEditor library
Our library, RichTextEditor uses KMM to package and distribute webview-based rich text editors. There is no data storage, network calls, etc. Here's a high level overview for our RichTextEditor library.

Copy, Refactor, Repeat
We started our project by combining code from the richeditor-android and RichEditorView libraries. Because RichEditorView forks richeditor-android , much of the HTML, CSS and JS is the same. We took that logic and put them into internal Kotlin constant Strings:
RTE_HTMLCSS
For JavaScript, we have shared JavaScript contained in PRE_PLATFORM_JS. We also need to add an expect fun platformJavascript function which returns platform-specific JS using actual since there we need to handle minor differences between Chrome and Safari.
RichTextEditorView
This expect class defines the fields and functions the UI view. The actual Android and iOS code will implement. Note that all the function are internal. Devs will interact with this view using RTEViewInteractor
expect class RichTextEditorView {
    internal var ready: Boolean
    internal fun getHtmlContent(onFetched: ((String) -> Unit))
    internal fun executeJs(script: String, onComplete: ((String) -> Unit))
    internal fun encodeURL(url: String): String
    internal fun changeFocus(focused: Boolean)
}
Android: This implementation extends WebView with additional logic to handle the HTML/CSS/JS used in the editor. In Fleetio Go, we wrap this view with Compose.
iOS: This implementation extends WKWebView with additional logic to handle the HTML/CSS/JS used in the editor. In Fleetio Go, we wrap this view with SwiftUI.
RichTextEditorViewFactory
This expect class defines a factory class to build RichTextEditorView. The actual Android and iOS code will implement.
RTEViewInteractor
It's not possible to have an expect class with some shared functions so we need to create a wrapper around RichTextEditorView to handle these interactions. Here's a snippet
class RTEViewInteractor {

    private var view: RichTextEditorView? = null
    private var eventHandler: ((RTEEvent) -> Unit)? = null

    fun setBold() {
          view?.executeJs("javascript:RE.setBold();") {

          }
    }

    fun createLink(url: String, title: String) {
      view?.executeJs("javascript:RE.prepareInsert()") {
          view?.executeJs("javascript:RE.insertLink(\"$url\", \"$title\");") {}
      }
    }
    // end snippet
}
Sample Usage
Here's a sample of how to use the editor from Compose on Android:
@Composable
fun RichTextEditor(initialHtml: String = ""){
  AndroidView(
  modifier = Modifier
      .background(Color.LightGray)
      .padding(16.dp),
  factory = { context ->

      val factory = RichTextEditorViewFactory(
          context = context,
          initialContent = initialHtml,
          logListener = RTELogging,
          onEvent = { event ->
              println(event)
      )

      factory.view.also {
          interactor = factory.interactor
      }
  },
  update = { webby ->

  }
}
And where's Swift usage with SwiftUI:
// Create ObservableOject to handle factory and interactor
final class RichTextEditorService: ObservableObject {
  var factory: RichTextEditorViewFactory?

  func configFactory(intialContent: String) {
    factory = RichTextEditorViewFactory(
      initialContent: intialContent,
      logListener: RTELog(),
      onEvent: onRTEEvent)

    factory!.interactor.setPlaceholderText(placeholder: "Add a comment...")
  }

  func onRTEEvent(event: RTEEvent) {
    print(event)
  }
}

// Wrap generated UIView so it can be displayed in SwiftUI
struct RTETextView: UIViewRepresentable {

  @EnvironmentObject var rteService: RichTextEditorService

  private var service: RichTextEditorService

  init(service: RichTextEditorService) {
    self.service = service
  }

  func makeUIView(context: Context) -> WKWebView {
    rteService.configFactory(intialContent: "")
    let webView = rteService.factory!.view
    return webView
  }

  func updateUIView(_ uiView: WKWebView, context: Context) {
  }
}

// Use wrapper in SwiftUI
@StateObject var rteService = RichTextEditorService()
RTETextView(service: rteService)
Tips and Tricks
Learn how KMM compiles for iOS
KMM uses Kotlin/Native to compile Kotlin into native binaries. For iOS, this is accomplished using Objective-C. For much of KMM development, you will just be writing Kotlin shared code, but on occasion, you will need to interact with native platform features. It's helpful to know how Kotlin code maps to/from Objective-C. https://kotlinlang.org/docs/native-objc-interop.html
Don't overuse Expect and Actual
From: https://kotlinlang.org/docs/multiplatform-connect-to-apis.html#examples
Use expected and actual declarations only for Kotlin declarations that have platform-specific dependencies. Implementing as much functionality as possible in the shared module is better, even if doing so takes more time.
Don't overuse expected and actual declarations – in some cases, an interface may be a better choice because it is more flexible and easier to test.
An expected class cannot have any implementation
If you building an expect/actual class, you cannot have any functions implemented. The expect class is basically an interface. If need to have shared functions, create a separate common class.
You can’t subclass an Objective-C class and a Kotlin class
Let’s say you are trying to extend a view (View in Android or UIView in Swift). You define an interface which adds functions, or use use a delegation pattern. This will not compile. Currently, you cannot mix Kotlin and Objective-C supertypes. https://kotlinlang.org/docs/native-objc-interop.html#subclassing. This was a primary reason we build RTEViewInteractor.
Concurrent Development
Using a single shared library for your entire app allows for a much easier deployment process but can present challenges when multiple developers need to work on the shared library. Here are some tips and tricks that should help our dev team avoid conflicts and be more productive:
Use a Consistent Branch Naming Scheme
At Fleetio, we use this scheme for naming shared library branches
<type>/<ticket>-<description>
<type>- The type of issue this branch addresses. The different types arefeature- Branch for new feature workchore- Branch for engineering improvements or minor non-feature workbugfix- Bug fix
<ticket>- The Jira ticket number. If you don’t have a Jira ticket, use the Go parent ticket as the ticket number or consider creating a task in Jira<description>- brief hyphen-separated description of the changes.
Examples
chore/GO-1234-add-some-componentfeature/GO-2345-shared-api-component
Version your Branch Changes
Using Gradle, set up your library versioning to use a unique identifier for your builds. At Fleetio simply append the Jira ticket key to the version string. For subsequent builds, you can also append another number.
LIBRARY_VERSION=1.0.1-GO-1234-build-0
LIBRARY_VERSION=1.0.1-GO-1234-build-1
Before merging into your main branch, remove the Jira ticket and build number and increment the main library version accordingly:
LIBRARY_VERSION=1.0.2
Final Thoughts
When introducing KMM to your team, I suggest the following points:
- Start Small: Even if your first update in your existing apps is to add an empty shared KMM library, that is a big step in verifying your deployment works and helps foster confidence moving forward.
- Include iOS Devs: From the get-go, make sure your iOS devs understand how KMM works and are included in the process. Helping to understand that the framework will work with Swift but that there are Objective-C considerations to be aware of.